- Vector graphics use mathematical equations to draw out the designs making them resolution-independent.
- These mathematical equations are translated into points that are connected by either lines (or) curves also known as vector paths, and makeup all the different sizes.
- Points are defined in terms of 2D-points, each of these points has a definite position on X- axis and Y- axis of work plane and determine the direction of path.
- Bitmap (or) Raster graphics are made up of tiny squares called pixels.
- Raster graphics can typically be scaled down with no loss of quality, but enlarging a bitmap image cause it to look blocky and "pixelated".
- Widely used Raster file formats are .Jpg, .png, .gif, .bmp.

- In vector graphics, the edges of each object within the graphic stay smooth and clean.

- This makes vector graphics ideal for logos, which can be small enough to appear on a business card, but can also be scaled to fill a billboard.

- Commonly used vector file formats are .svg, .cgm, .xml, .odg
- Animations also use vector graphics, since they scale better and typically take up less space than bitmap images.
- Vector images are often used in graphic design, website design, and commercial marketing.

- We can also convert raster images into vector images by using Adobe illustrator, Coreldraw, or Macromedia Freehand and various websites like https://vectormagic.com/ etc.
by using Adobe illustrator.
1. Step: Pick an image to convert to vector
 2. step: Trace the image
1. Step: Pick an image to convert to vector
- Select an image which we want to convert. Preferably, the image should have a white or transparent background.
- The image tracing tool allows us to take the color information of an image and create a traced duplicate. The duplicate image, a close replica, can be used to create a vector.
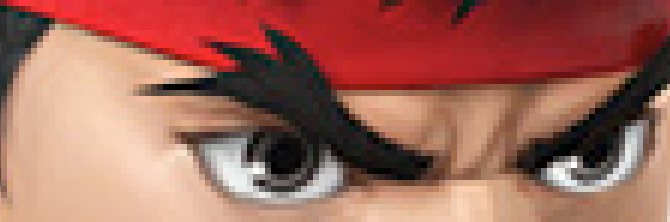
- First, open image in Illustrator. Select the image to activate image options. These options should be present on the top of your Illustrator window. Then, click on the dropdown menu beside Image Trace and select either High Fidelity Photo or Low Fidelity Photo.

- Image will go through the tracing process automatically. You’ll note several changes to your image, but overall it should remain much the same. For example, the following is a closeup of image before the tracing process.
- Here is the image after the process
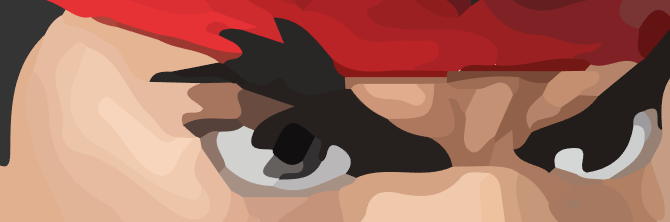
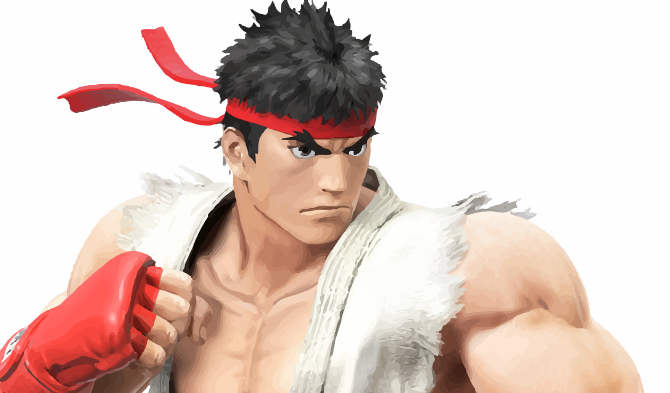
- While much of the detail has been stripped from the original image, it also appears much sharper. You’ll note the color shapes do not pixelate no matter how close the image is zoomed. The overall image should remain the same. Here is our overall image before editing.

- Here is our image after editing
- In order to finish vector, you’ll need to separate these color groups to edit them. To do so, select your traced image and click on the Expand button on the top of the window.

- This will allow you to view the composite shapes which make up your image. Your image should now have a blue outline when selected. Next, right-click the image and select Ungroup in the following menu. This will allow you to separate your color shapes into individual parts.

- In Layers panel, note your color groups have been separated into layers.
- After converting a raster image to a vector, you have free range to edit the image. Begin by deleting whatever color groups you desire. You can select whole color groups by clicking on a shape and heading to Select > Same > Fill Color. This will select all groups with the same color as the one selected using your Direct Selection tool.

- Then, hit Backspace on your keyboard to delete the shapes. If you’d like to modify or expand a particular color group, you can do that as well by selecting a layer using the Direct Selection tool. After you’ve selected a layer, fill in empty spaces or add additional colors to your design using the Pen or Brush tools.
- Here is the original image after changing the white background and modifying the image slightly using the method presented above.

- Now we’re ready for the final step in converting an image to a vector in Illustrator: saving the image in a vector format to preserve its quality. There are a variety of vector image formats to choose between: PDF, AI, EPS, SVG, and others. We’ll use the SVG format. When you’re finished with your image, head to File > Export > Export As.
- In the following window, title your file and select SVG in the drop down menu beside Save as type.

- Advantages and Disadvantages
| Disadvantages | |
|---|---|
| Vector objects are much smaller than raster image format. If we have full size image to update, the vector file might only take few kilobytes of space on your system, where the same image in medium resolution bitmap format might not place on CD ROM. | Thin lines in vector images may disappear if we reduce the size too much. |
| Graphical outputs of the images are more pleasing than the created as raster image | The location of each vector, need to be stored separately. |
| The important point of vector graphics is the power of scalability. If we try to enlarge the pixel based image, it only enlarge the size of the squares making up the image area and pixel based image will be jagged. If we consider the vector image, it will remain in its best quality. | It limits the functionality for larger data sets. |
| Every lines in a vector graphics represents different and distinct object so each object can be edited as many times. For example, if we take art file with a circle in back ground. It can be opened any time even days later and change circle to a square. It will be at their best quality. | The very important disadvantage of vector image is time consuming and also specific knowledge must be needed to create it. |